Starting an Amazon Business
Now that you know what it takes to register as an Amazon seller, you’re ready to take the next step. But there’s a question you need to ask yourself first…
Are You Ready to Sell on Amazon’s Marketplace?
It’s a complex system, no matter how much retail experience or online experience you already have.
In this chapter, we address several key questions:
- What happens when you launch?
- Why is this a significant step?
- What is now expected of you as an Amazon Seller?
- Do you launch with the most important products you plan to sell?
- Do you launch before getting un-gated in your key categories?
- Do you create new listings or match to existing listings?
Before we move into the many aspects of getting launched, know that you are considered a “launched” seller as soon as you have uploaded your first product in Seller Central—even if you do not have any inventory to support that offer.
Key Concepts for Amazon Sellers
Let’s clarify a few concepts that will save you a lot of confusion and frustration.
ASIN
- This is an acronym for “Amazon Standard Identification Number”
- It’s the unique 10-digit product identifier that Amazon assigns to a product when it is listed for the first time on Amazon
- It is usually tied to a product’s unique UPC or EAN (International Article Number, the European equivalent of a UPC)
- You may hear the term of the “BOO” number, as the ASIN typically has the structure of B-zero-zero, followed by seven letters and numbers
- If the item is a book, the item’s ASIN is in fact the book’s unique 10-digit International Standard Book Number (ISBN)
- Once an ASIN is created, it isn’t tied to a specific seller. It identifies only the product itself.
Product Detail Page
- The visual representation of the ASIN…so when you look up a product on Amazon, you’ll be taken to a product detail page or “product page”
- This contains the key details like product title, brand name, bullet points, product description, product image, and the name and prices of the sellers with positive inventory of this item available for sale on the Amazon’s marketplace right now
- Each product detail page has a unique ASIN connected to it, just as each ASIN has a unique product detail page connected to it
Offer or Listing
- An offer or a listing is a seller’s contribution to an ASIN.
- If the seller indicates to Amazon that it has product to sell against a particular ASIN, the seller will be designated as having an offer on the ASIN
- If a seller indicates that it will be selling an item where no ASIN exists today, Amazon will create a new ASIN in its large catalog, and then link that seller’s offer to the new ASIN
- Amazon’s intent is to get identical offers from different sellers all listed against the same ASIN. That way, customers can see all of the available choices of “offers” across the sellers offering this ASIN for sale on Amazon.
- If all of the offers are shown on the same product detail page, customers can more easily compare prices and delivery speeds to decide which offer makes the best sense.
Seller SKU
- The Seller SKU is the unique code that the seller uses in its Amazon catalog to label its offer on a specific ASIN in a specific condition.
- The seller can create any unique code it wants for each offer- there is no specified or required naming convention.
- The seller can have different Seller SKUs on same ASIN if the seller is listing more than one condition of product. So, if for example, the seller had a new-condition offer and a used-condition offer of the same ASIN, the seller would actually create two separate Seller SKUs to differentiate these two offers. Likewise, if the seller chose to list one offer for sale through Amazon’s Fulfillment by Amazon (or FBA) program, and another offer for sale to be fulfilled by the seller, those two offers would also get separate Seller SKUs in the seller’s Amazon catalog.
- Please note that only the seller sees information on the Seller SKU details – it’s basically an internal book-keeping mechanism to help the seller keep track of offers on Amazon.
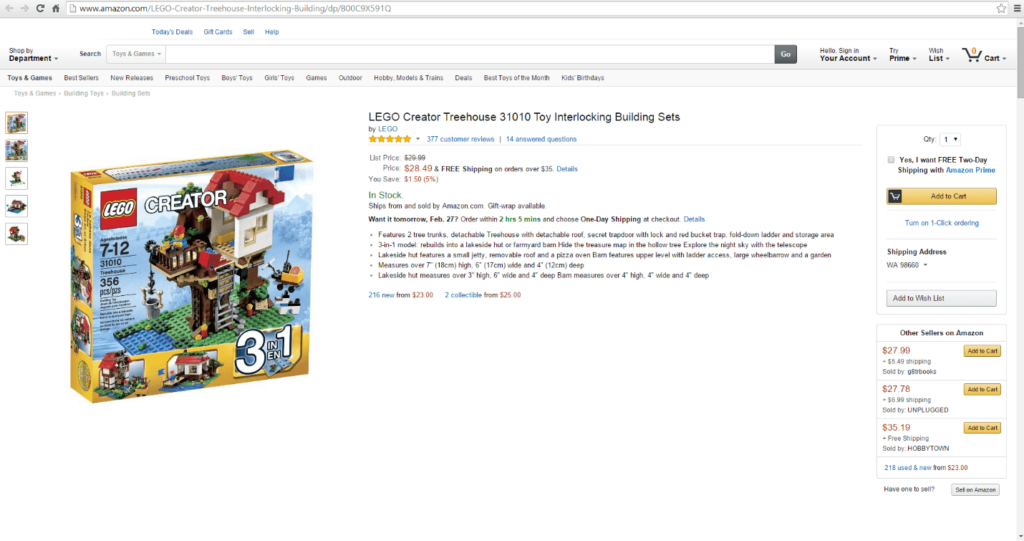
An Amazon Product Detail Page in Action
Now let’s have a look at a product example. Open your web browser and search for “Swingline stapler” on Amazon.com (or just click this handy link). Then click on one of the products listed in the search results.
Here’s what you’ll find:
- You can see the ASIN contained in the URL at the top of the page.
- You can see the actual product detail page, which is the visual representation of that ASIN
- You can see which sellers have active offers on this product:
- In the buy box
- In the “other sellers on Amazon” section
- And in the many other listings under that section.
- To see the inactive offers on a listing, you’d have to be the seller with an inactive offer on this product, or Amazon using its own internal tools
- And for data on the “Seller SKU,” you would need to sign into Seller Central to see what Seller SKUs you’ve used to identify your offers on this ASIN.
Adding Your Offers to Amazon’s Catalog
It’s important to understand the different ways of loading products so you avoid unnecessary work, delays and headaches getting your products up for sale.
We once had a new Amazon client that created 45,000 listings from scratch—only to find that more than 43,000 of them were already listed on Amazon under existing ASINs. What a waste of time and energy!
Given that there are already 300MM+ products on Amazon, there is a decent chance many of the products you want to list on Amazon have already been listed at some point by some other seller—so if they have already been listed, an ASIN exists in Amazon’s massive catalog.
And because of the way the cataloging process works on Amazon, even if you tried to create new listings on products that have already been created as ASINs in the Amazon catalog, your listings would likely get matched to the existing listings – thereby nullifying a lot of your work trying to create your listings from scratch.
To avoid having to do a lot of unnecessary work, it’s crucial to first check to see if your products have already been listed on Amazon. This will save you a lot of time creating listings from scratch.
How to List Your Products on Amazon
There are six common ways to list a product.
1. The “Sell on Amazon” button
If you have a few dozen products to add, and you’re able to find them already offered on Amazon.com by other sellers, it is likely easiest for you to use the “Sell on Amazon” button at the bottom right of the list of sellers shown on the product detail page.
You would find the specific product detail page by searching for the items using the product name or UPC in the Amazon search bar. Through the “Sell on Amazon” button, you can add your offer to this listing, where you are asked to provide your Seller SKU, price and quantity for this product. The product “condition” is also needed, and you should review Seller Central’s guide on item conditions, to make sure you are properly grading the condition of your products.
While all of the other fields are optional, we encourage you to fill in the “Tax Code” field if you have plan to collect state tax on your orders. And this tax code is worth adding, whether you use this “Sell on Amazon” button or any of the other approaches discussed below.
If you repeat this for each product you aim to list, you can get your offers set up without having to provide any other data. Your listing will share the product information that has already been provided by other sellers to create this product detail page (including product title, product description, brand name, bullet points, images, list price).
It takes a long time to add products one at a time across more than a few dozen products, but this approach is a simple approach for up to a few dozen products.
2. “Add a Product” in Seller Central (one product at a time)
Instead of searching on the Amazon.com site to see if your products are already available on Amazon, go into Seller Central, to the “Add A Product” option. You can find this by using the main dropdown under the “Inventory” heading on the main Seller Central page.
Unlike the “Sell on Amazon” button approach, this approach will allow you to find products that may be currently out of stock and hence not showing up on Amazon.com at this time
Here you can use the product name, UPC or ASIN (if you know it) to find the product and then add your offer to it – the same variables you could have used on Amazon.com to search for these items.
If you find your product shows up here, you can add your offer to the ASIN, essentially using the existing data on this ASIN to apply to your offer. Sometimes you may find that searching using a product name, UPC or ASIN will generate more than 1 listing on Amazon – and sometimes those listings are identical, as far as you can tell.
Unfortunately, there are ways that duplicate listings get created on Amazon, resulting in this confusing situation. Now you have to pick the listing which matches your product – if you get a perfect match (clearly the exact same product with same UPC and same package quantity), you should consider that as the product onto which you match your offer.
But what happens if there appears to be more than 1 perfect match in the Amazon catalog? While we would prefer to show you a live example on Seller Central, the terms of the Amazon’s Seller business agreement prevents us from doing so, but we’ll explain the use case we expect you may have at some point:
Suppose you wanted to add to your catalog a listing for one of my favorite candies, Twizzlers. If you typed in “Twizzlers Strawberry Twist 180-count” in the “Add A Product” search bar right now, you would find many listings of this item – some offer different package quantities of this 180-count item, including a 2-pack and a 3-pack. You would also find what appear to be duplicate listings of the same 1-pack of 180-count Twizzlers candy.
Let’s say you were trying to list just a 1-pack of 180-count Twizzlers: the key question to answer is which of these single-pack listings is the one onto which you should add your offer.
The best bet here is to click on the “See all product details” links of each duplicate listing, scroll down to the “Amazon Best Sellers Rank” on each product detail page to see which has a better sales rank – the lower the sales rank, the better the customer traffic and sales right now. You probably want to put your offer on the ASIN that has the lowest sales rank, corresponding to the most traffic and sales.
While some sellers aim to put their offers onto secondary duplicate listings because of lower competition or more opportunity for more profit per sale, it rarely works out in the long-run, as most customer traffic and sales typically converge on a single key listing for each SKU.
Ideally we would like to see no such duplicates in Amazon’s catalog. Instead all of the traffic and customer sales from these duplicate listings would converge on a single listing – while you could ask Seller Support to merge these apparent duplicate listings, the usual response you will get is that duplicate listings are supposed to get merged by Amazon’s Catalog team, so it becomes a waiting game to see if and when the Catalog team is able to identify and merge such duplicate listings.
3. “Add a Product” – “Create a New Product” through Seller Central
Like the previous approach, go into Seller Central, to the “Add A Product” option, which is found by using the main dropdown under the “Inventory” heading on the main Seller Central page.
This time, after you’ve tried to find the product in the “Find It on Amazon” search box on the “Add A Product” page, you will see that below the search box there is a “Create a New Product” button.
By clicking on this, you can start the process of creating a completely new product listing on Amazon.
You will have to classify your item into the right product category, then fill out a number of required fields of data for that item, including providing a product image that complies with Amazon’s image requirements.
Once you have completed all of these necessary steps, your item will be created in the Amazon catalog, and your offer on this item will be available immediately, if you have indicated that you have positive inventory too.
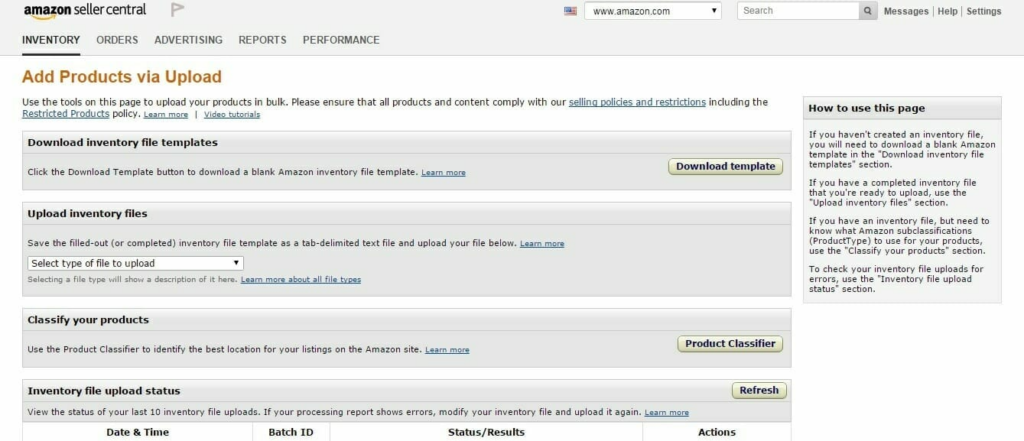
4. “Add Products via Upload” in Seller Central (using the Inventory Loader template)
If using the ASIN, UPC, or EAN, in your search and you find that your products are already offered on Amazon by other sellers, you can use the simple approach of the Inventory Loader template, which allows you to load in your offers that match ASINs, UPCs or EANs already in Amazon’s catalog.
To download this template, search for “Inventory Loader” in Seller Central. While the Inventory Loader template has tabs to show the specific instructions for loading your offers, the basic instructions are that you will need to create a unique “Seller SKU” for each of your product offers, and match that to the ASIN, UPC or EAN data for the listings already in Amazon’s catalog.
One note of caution: while the ASIN, UPC or EAN may appear to match your product, make sure to verify that the item package quantity on the current Amazon listing is consistent with your product – you don’t want to be selling different package quantities under the same ASIN.
In situations where you don’t know for sure which items in your catalog may or may not yet be in the Amazon catalog, you can try loading them using the product UPCs – if the UPCs aren’t in the Amazon catalog yet, those specific products won’t load, and you’ll get an error message telling you so. Then you know which listings will need to be created using the Flat File templates, outlined below. All of the listings that don’t get an error from the Inventory Loader approach will be nicely loaded and live for you.
Note: if there happens to be multiple listings in Amazon’s catalog that have the same UPC, and you use the UPC as the product ID in the Inventory Loader, you won’t be sure which ASIN Amazon decides to put your offer onto. This is a nuisance, and may cause problems down the road. If you happen to know the ASINs onto which you want to match your offers, that approach can be superior to using the UPCs, due to this UPC matching limitation.
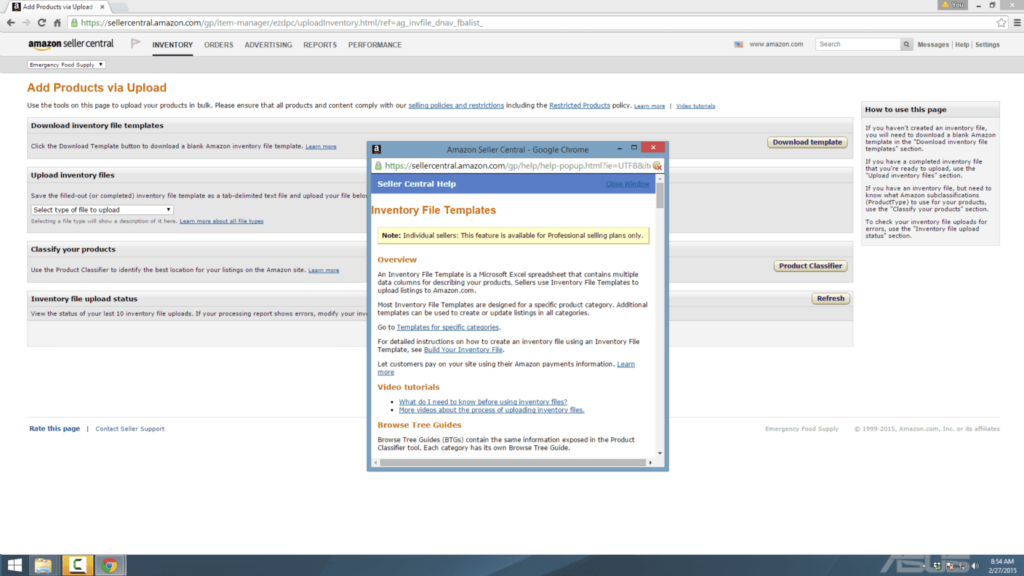
5. “Add Products via Upload” in Seller Central (Flat File Excel templates)
Typically, this is the approach that Amazon suggests if you have more than 100 offers to list. We like to use this approach only for products that are not yet in the catalog, as it takes a lot of effort to create a flat file template. Our suggestion is to list as many products you can using one of the first three approaches for products known to be in the Amazon catalog already, and then use this approach for products which have not been loaded by anyone else into the Amazon catalog.
Based on the products you know are not yet in the catalog, you will need to first identify in which Amazon category those products should be listed.
If you have items to add from multiple categories, you will need to submit more than one flat file.
Each category has a different set of required and desired variables, thereby leading to different flat file templates being used for each category. Those templates are available under the “Download Template” button on the “Add Products Via Upload” page.
Within each flat file template, there are tabs outlining the specific instructions on how to load data, and what forms of data are allowed, required, and desired. Before creating the data for all of your new listings, try out the template with data for a dozen or so listings to get the hang of the template first.
While each item will need to be classified using Amazon’s classification scheme, Amazon has made available the user-friendly “Product Classifier” tool to help you figure out the right classification label to use on each item. You can find this Product Classifier tool through the Search bar on Seller Central.
Once you have your product template ready to submit, upload the template on the “Add Products Via Upload” page, in the “Upload Inventory Files” portion of the page, selecting “Inventory Template for non-Media Categories” or one of the many media templates, depending which types of products you’re uploading.
As Amazon keeps adding new template formats, you may find additional options available in time that better meet your needs, where you can re-use parts of product feeds you’ve had to create for non-Amazon marketplaces.
When you load your flat file template, it gets processed into the Amazon catalog, and may generate any number of error messages. Sometimes these error messages are caused by bad/missing data in the flat file, and sometimes the errors are caused by bad existing Amazon data not meshing with your new data.
Seller Central offers a litany of error codes that can help you to identify the nature of your flat file template errors, but be patient, as it will take time to get comfortable with the error diagnosis process. And you may need to reach out to Amazon’s Seller Support (top right corner of every page in Seller Central), where you can get specific coaching/guidance on how to resolve errors from specific “batch ID” flat file template uploads.
Keep in mind that if you are still having problems with your feeds, you can submit your template to Seller Support, and they will often help you by sending you back a corrected form of the template.
Some advice with regards to flat file templates: if you are adding a lot of listings new to Amazon’s catalog, expect that it will take many days to prepare and upload all of your data to Amazon’s catalog. We suggest that you start by prioritizing the listings you believe represent the best opportunities for you to sell on Amazon. Get those ready and uploaded first so you can sell some items while you work on getting the rest of your new listings created and uploaded into the Amazon catalog.
Reminder: don’t try to reinvent the wheel by creating flat file templates for listings that are known to be already in the Amazon catalog. You’ll waste huge amounts of time essentially resubmitting data that’s already been locked and loaded in Amazon’s catalog by other sellers .
The priority here is:
- Get your offers on known Amazon listings added first.
- Create flat file templates for your most important set of new products that aren’t yet in Amazon’s catalog.
- Load all other new products through flat file templates over time.
6. Via XML feeds
This is not an approach most sellers use, but we note it as very large sellers with typically a lot of new selection will work with feed integration companies to get listings submitted through XML-coded feeds.
We aren’t going to go into any specific detail on these, and they are out of scope for the vast majority of sellers today.
If you want to learn more, read the technical specifications in Seller Central.
How to Decide Which Method to Use to Add Your Products
To get your listings up on the site, there are a few questions you should ask yourself:
- How many products to get started?
- What proportion of your products added to catalog by other sellers?
- Do your products have accurate UPC information?
We like to see sellers getting at least some of their listings up soon after registration. Then over the coming days and weeks, sellers can invest more time to build remaining listings. If you find a lot of your products are already tied to ASINs on Amazon, you should be able to get your listings set up very quickly.
If you work with us, we’ll help you determine if your products are already listed on Amazon before you try creating new listings for all of them, by matching your product UPCs to existing ASINs on Amazon.
Before we finish this discussion, there are a couple of important issues to consider
- In Seller Central, if you search for “Choose a Listing Tool,” you’ll find a tool that offers advice on what sort of listing approach you should use. We don’t particularly like this tool, as it misses key criteria for simplifying the listings process. We prefer that you use our logic of first identifying how much of your selection is already in the Amazon catalog, so you don’t have to recreate listings from scratch unnecessarily.
- If you have some products that require Amazon ungating and some that don’t, plan to get the ungated products listed while you wait for your gating requests to be approved. This way, you can start generating sales of the products in ungated categories, and getting comfortable with the listing tools, even before any gated categories are opened to you. If the majority of your listings or the most strategic portion of your catalog are in gated categories, it is worth getting the ungating request process started as soon as possible in order to find out if you are going to be able to list these items on Amazon.
Important Issues To Consider When Listing Products
Once you’ve figured out how to list your items, there are several key issues to consider with each approach to listing products. Let’s discuss:
1. Being accountable for your products
Sellers have repeatedly been guilty of not paying attention to the specific aspects of their products. Issues like what are the specific ingredients of the products, where are the products manufactured, or what laws apply to the sale of these products.
There have been events in almost all Amazon categories where regulation has changed, and sellers were not responsive to those changes partly because the sellers didn’t really understand how to tie changes in regulation to specific items they offered on Amazon.
Unfortunately, when Amazon sellers don’t have a clear enough understanding of the specifics of their offers, they were not able to act quickly – often meaning that they don’t remove their inventory and delete these listings immediately after Amazon notifies them.
Amazon has suspended countless sellers because the sellers didn’t respond to the warnings or notifications that Amazon provided regarding specifics of the sellers’ products. The big lesson here is that it is the responsibility of each and every seller to know exactly what is in their products, and make sure that their products are accurately described and law-abiding, no matter the complexity that forces on the sellers.
Whether you are selling groceries, jewelry, health & beauty or any other item, you are responsible for knowing the ingredients in your products, and being able to respond very quickly to any listing restrictions that Amazon implements.
2. Incorrect Matching
What happens if your offers aren’t matched properly onto the right listing?
Unfortunately, if you use one of the simplified offer creation approaches (such as the “Sell on Amazon” button, the Inventory Loader feature, or the “Add a Product” one at a time feature), your offers may end up being matched incorrectly to listings which aren’t the right representation of your offer. We have seen products with misapplied UPCs getting matched to another product that was correctly using the UPC, resulting in a sock being matched to a teacup.
We have also seen a 1-pack of a product being matched to a 10-pack of the same item, where one of the sellers hadn’t properly submitted item package quantity data, creating quite a lot of confusion for customers and sellers alike. If you see your offers being matched to the wrong types of existing listings, it is critical to do the following:
- Submit a ticket immediately to Seller Support to investigate what is going on (see what data you can provide if you think you know what the root cause of the problem is)
- Zero-out your inventory on this listing until the problem is resolved. You don’t want to get customer orders on such listings, because it’s likely to lead to unhappy customers or highly unprofitable orders for you. Either way, the transaction isn’t good, so eliminate any chance of a possible customer transaction by zeroing out your inventory immediately (which may require deactivating FBA inventory, too).
- Double-check your UPC and item package quantity data – usually the matching error can get fixed by cleaning up these two pieces of data on your new offer or the existing listing
3. Correcting data on your listings
If you find that you have added an offer to a listing that appears to have incorrect or questionable data on it, you should immediately file a ticket with Seller Support, outlining the data issue, and requesting the data be changed or removed.
Even if you didn’t provide the data yourself, you are responsible for making sure the content is correct, and your account could be suspended for failing to keep an eye on the accuracy of your data.
Unfortunately, you may contribute correct data but another seller may have provided inaccurate data that overwrites your correct data – again, you should file a Seller Support ticket immediately, highlighting the false claim or inaccurate data.
We have seen sellers get suspended for having inactive listings on products that have been banned recently by government organizations or even by Amazon. Our strong advice to sellers is to review their listings regularly to check if an item might be high-risk for regulation or government review.
Even if a product is not high-risk, we strongly recommend that sellers DELETE any listing where they have no current inventory and do not plan to sell those items again in the future – Amazon can still deem you responsible for inaccurate content or guilty of listing an item even if your offer is inactive.
4. Setting a Naming convention for your listings
Your Seller SKU names will be seen only by you in your Seller Central account. Yet if you have problems finding your products in Seller Central, or you get mixed up about which Seller SKUs actually match which inventory you have, these problems can create all sorts of issues downstream for you.
We suggest that before you list a single item on Amazon, you create a naming convention which you believe will scale with you as you grow your business over time.
We have seen sellers be successful in using some kind of brand or distributor indicator as well as SKU or UPC identifier in their Seller SKU naming convention.
Remember that every Seller SKU has to be unique, so you want a clean way to organize all of your listings. If you end up with a bunch of listings down the road that aren’t named properly, the process of renaming them or creating additional Seller SKUs to replace them can be so confusing and time-consuming that you will thank us now for this timely advice.
Here are some examples of poor naming conventions
- The no-show
Some sellers don’t list a SKU number when creating a new product, and Amazon assigns its own randomized number. Here’s an example of what their SKU numbers look like (S2-1JBM-QOPV) …good luck knowing or remembering what product is associated with that number. So, make sure you provide a SKU number when you create your products. - Inconsistent Names
Some sellers, usually resellers, use inconsistent naming conventions. Most of the time the naming order stays the same within each batch of inventory created, but across different batches of inventory you’ll find the Brand Name, Color, Size, Gender, and other attributes in different orders. If your books are also like this, you will need to undergo some major overhauling to get things corrected, but it will be worth it in the end. Managing purchases and understanding your inventory will be drastically quicker and less data entry mistakes will be made. - Non-abbreviated names
Longer names can take much longer to mentally process as you look through your selection of SKUs.
For example, “Mens.Adidas.RunningShoe.SizeEight” may seem like a smart approach, but we have clients with thousands of SKUs listed this way.
Unfortunately, they regret listing their inventory this way as it’s difficult to understand when looking at more than a few SKUs at a time, difficult to sort for comprehension, and takes up too much screen space in Seller Central, CRMs, and spreadsheet applications like Excel. A cleaner naming convention would look like the following: “Adidas-RS-M8.”
Appropriate Naming Conventions
- If you are a reseller or distributor, consider naming your products after the Manufacturer Part Number, so your purchase order and accounting system seamlessly matches your Amazon reporting. Most manufacturers use an abbreviated system that makes sense pertaining to the product line.
- If you are the manufacturer, think letters & numbers. As an example, if all you make is tennis balls, for a “Pro Series Tennis Ball Pack of 8,” try something as simple as PS-8 or PS-A-8 for Pro Series Adult Pack of 8.
- The goal is to create an easily understandable abbreviation for your product that lists its defining qualities.
5. Understanding Your Content Authority Score
When you contribute content to Amazon’s catalog, you are providing content that may get combined with other sellers’ content for the same listing. In order to establish whose content gets presented to customers.
Amazon has developed a “content authority score” for each seller based on the type of seller, the performance metrics of the seller, as well as manual intervention by Amazon employees.
As a new seller, it is fair to assume that your content authority score is not likely anywhere near as high as other larger, well-established Amazon sellers, meaning that a lot of content you provide will not show up, instead getting trumped by some other seller’s data, no matter how accurate or complete that seller’s data actually is today.
Unfortunately, your content authority score is not revealed to you by Amazon, though any seller can file a ticket to Seller Support, asking to have incorrect data fixed.
You must examine the quality of the data on your listings, especially if you added products through the “Sell on Amazon” button, “Add a Product” one at a time feature, or the Inventory Loader features, as each of these processes allows you to use existing sellers’ data on your offer, regardless of that data’s accuracy or appropriateness.
And even if you create completely new listings on Amazon, another seller with a higher content authority score could come along later and change the content on your listing. Though Amazon will send you an email every time this happens to make you aware of what’s happened, so you can review and challenge the change, if necessary.
Customers will see the content, right or wrong, and act based on what they see….if the customer believes he has been shown inaccurate data, you may get hit with negative feedback, or worse yet a customer return, based on this incorrect data that you didn’t even contribute.
In a later chapter, we will discuss Brand Registry, which is one way to get content locked down, if you are the manufacturer or approved agent of the brand’s rightsholder.
Please note that while content authority scores apply to the prioritizing of whose textual content shows up for all sellers on a product, any seller can add an image to the listing, and that image will show up when that seller is the “buybox winner” of the listing.
While all images on Amazon are subject to Amazon image requirements, bad images rarely get removed without a complaint filed to Seller Support by another seller. If a seller hasn’t uploaded any images herself, she could find her offers matched to the bad images uploaded by someone else when she is the buybox winner.
Keep an eye out and monitor your listings regularly, especially ones with a lot of offers from competing sellers.
6. Understanding Restricted Products
While Amazon seeks to be the shopping destination for practically everything, it has taken measures to restrict the sale of certain products that it has decided to not allow for sale, whether because of internal legal concerns or external government regulation. If you have a product that you believe might not be deemed appropriate for all shoppers, or a product that has known regulations in brick and mortar settings, please review this list of restricted products before buying inventory or trying to create listings on Amazon.
7. Understanding Listing Restrictions
Unlike a product that is restricted from being offered on Amazon, any product’s content could be inaccurate, and needs to be managed by you if you have an offer on a listing, whether that offer is active or inactive.
Whether a listing that you created new yourself, or one where you are adding content to an existing listing, you are responsible for the accuracy of that content, including any apparent claims made in the listing.
Common seller errors include errors around what ingredients/chemicals are contained in the product, where the product is made or assembled, what the product is expected to do for the customer. Please review the listing restrictions documents in Seller Central to examine these pain points in more details
8. Using Parent/Child Relationships in Your Listings
Certain Amazon categories allow sellers to organize similar products together on the same master listing.
For example, if you offer the same model of sports helmet in different sizes and colors, all of the size-by-color combinations (called a “child ASIN” or “child listing”) could be shown on the same master listing (called a “parent ASIN” or “parent listing”), rather than showing each specific color combination on its own product detail page.
There are several advantages to combining such items:
- Customers see all of the available options in one place.
- Lesser-known options can get equal visibility to better-known options.
- If the customer’s desired option is out of stock, customers can still see other options, hopefully resulting in a sale.
- Amazon aggregates the search traffic and sales of all child ASINs on the same parent ASIN, resulting in the parent ASIN getting higher visibility in Amazon search results.
If you sell many variations of the same product, it is usually better to put them together to get higher combined traffic rather than separating out the products.
Note that once the sales have been combined to create a single sales rank for the parent ASIN, you won’t be able to figure out which child ASINs are selling the best from the sales rank figure.
There is a detailed description in Seller Central about how to create parent-child relationships, which has to be done through a Flat File or XML template submission; search in Seller Central for “Creating Parent-Child Variation Relationships” for more details.
Here’s the key issue you need to consider when it comes to parent-child ASINs: Do you want your products to be shown together, or does it make more sense for them to be shown separately? If you try to combine products that don’t really belong together, this will likely lead to customer confusion about what is being offered on the product detail page.
In addition, not all categories allow parent-child ASINs, even if you or your potential customers may desire such a structure.
9. Creating FBA Listings vs. Non-FBA Listings
If you decide to let Amazon handle your order fulfillment, those orders are considered “Fulfillment By Amazon” (FBA) orders.
It’s worth noting that there are times when a seller decides to send inventory of specific SKUs to Amazon for FBA, but the seller could also be fulfilling that SKU themselves.
Amazon rules allow a seller to create two offers (in the same condition, such as “New” or “Used – Like New”) where one offer is an FBA offer and one is a regular non-FBA offer. Both of those offers can be live at the same time from the same seller—this allows a seller to have a seller-fulfilled offer available for customers to buy, should the FBA inventory sell out before the seller has time to replenish the FBA inventory.
This is a clever idea in terms of listings management to avoid the opportunity cost of lost sales due to out-of-stock FBA inventory, but it requires careful naming conventions for FBA/non-FBA offers in order to keep track of different offers on the same SKU. Note that typically, because of the way the Buy Box algorithm favors FBA offers over non-FBA offers, the seller is likely to sell through FBA inventory before selling through non-FBA inventory.
10. Using the Category Listing Report
Time for some secret sauce!
In order to identify what data is currently showing up against your listings, there is a special report available in Seller Central Inventory Inventory Reports, called the “Category Listings Report.”
Unfortunately, this is not a standard report typically available to view. To access it, you have to file a ticket with Seller Central, asking the Category team to turn on this report for you. The report remains in place for only 7 days (but you can re-request it over and over).
Nonetheless, once you have the report available, you can pull the report to see all of the columns of data currently in place for each of your listings. This sort of report is very helpful for understanding:
- Where incorrect data is present (allowing you to file tickets with Seller Support to get corrections made).
- Where key columns of data are missing (such as generic keywords or bullet points).
11. To Sticker or Not Sticker Your FBA Units
Before we finish this section, there are a couple of issues specific to FBA to call out. If you decide to use FBA for at least some of your listings, you can choose to have these listings stickered or not stickered, and each option has an implication for how you create your listings. If you decide to have some SKUs converted to FBA, the next decision will be whether you want these FBA SKUs to be stickered or un-stickered.
If a SKU is stickered, that means it will require a unique sticker placed over any UPC code already on the package—and on that sticker will be a new barcode identifying uniquely the product and you as the seller. Either you as the seller or Amazon (for a small fee) can apply the stickers on your FBA units. If you choose to have stickers on your FBA units, your FBA units will not be commingled with other FBA sellers’ units of the same items.
Here’s the tradeoff: putting stickers on each unit you send to FBA takes time and often requires the nuisance of opening case packs to apply stickers to each unit. Either that, or you pay roughly twenty cents per unit to have Amazon sticker the product for you.
However, unstickered units have the possibility of getting commingled with other FBA sellers’ units of the same products once they arrive at Amazon’s Fulfillment centers. If the other sellers happen to have sent in questionable product (such as counterfeit or damaged products, products with scuffed packaging, or products that are actually used but the seller is trying to sell as new), your perfectly good inventory will be mixed with these other sellers’ inventory.
When a customer places an FBA order for this product, Amazon will grab an FBA unit from the most convenient fulfillment center location and send it to the customer. If the customer discovers a problem with the product, that problem becomes your problem—even if the product wasn’t actually a unit you sent to FBA!
We have seen legitimate sellers get kicked off Amazon because counterfeit units got mixed in with their legitimate units, then customers received those counterfeit units and complained to Amazon, resulting in termination of these Amazon sellers’ accounts.
Ask yourself whether it’s worth spending less than a quarter per unit for Amazon to sticker these items for you, or the hassle of stickering the units yourself, in order to avoid the possibility that a questionable commingled unit gets sent to a customer. If you sticker your FBA units, only one of your FBA units will be sent to a customer, leaving any problems with the product directly tied to product you sent in yourself.
If you want to make at least some of your FBA units stickered, Amazon will convert your whole account to stickered, meaning all units of all SKUs you send to FBA will require stickering. If you decide that you have only some units you want stickered, here is a nifty trick: you can call Seller Support and tell them which SKUs you want to make stickered and which you want to leave commingled.
While on the phone, Seller Support can switch your account to stickering, make certain SKUs stickered, then switch your account back to no-stickering for the remainder of your SKUs. Now you are left with FBA SKUs where some require stickering and some do not.
Common Mistakes of Newly Launched Sellers
So now you have new offers for your products in the Amazon catalog, and you are a “launched” seller. What do you need to avoid doing to keep yourself in good standing with Amazon? We have seen far too many sellers do the following and hurt their standing immediately after becoming a launched seller:
Over-Experimenting with Listings
Sellers experiment with their listings but don’t pay much attention to proper pricing. Then they discover that one of their listings is actually live, possibly at a ridiculously low price (e.g., $0.01).
Customers place orders for all of the inventory that the seller had indicated it has for that product. Now the seller is faced with the tough decision of losing money on all of these orders, or having to cancel the orders to avoid the financial losses.
Neither is good, but canceling the orders can be even worse. All of this could have been avoided by paying attention to prices on all live listings.
Inaccurate Quantities
New sellers may not pay much attention to the quantities they show as available. Customers then place orders for more units than the seller actually has available to fulfill, and the seller is forced to cancel orders or delay shipments while they acquire more inventory.
Both late shipping and order cancellations are big strikes against a seller, new or existing—and may cause a seller to get their account suspended or closed by Amazon.
If Amazon deems a seller to be too high risk of upsetting or under-delivering to future Amazon customers, that seller is at risk of account suspension, so make sure you never list product you don’t have. Each unit that is late being shipped or cancelled counts as a separate violation by the seller, so a single misstatement of inventory levels could result in multiple strikes.
Furthermore, each bad customer experience could result in a piece of negative customer feedback, and each piece of negative feedback also counts as a separate strike against the seller.
It is worth noting that many new sellers on Amazon are initially amazed by how much customer traffic they get on their Amazon listings. This higher-than-expected traffic can result in a lot more sales than the seller expected.
If the seller has traditionally been lax about stating how much inventory was available for sale on other marketplaces/websites, this lack of accuracy can quickly catch up with the seller on Amazon, resulting in the easily avoidable and unfortunate need to cancel a lot of Amazon orders.
Slow Responding to Customer Emails
Sellers don’t answer customer inquiry emails fast enough – as a seller, you are expected to answer all customer emails within a 24-hour period, regardless of day of week or time of day. If a new seller hasn’t figured out how to check into Seller Central at least every 24 hours to check on possible customer inquiries, the standing of the seller account is risked.
This may seem like a pretty easy problem to fix, but some products receive very few questions from customers. That means a sudden spike in unanswered customer questions can take a long time to fix. As an example, one of our clients didn’t answer 6 customer emails on one particular day, and that resulted in a 5% drop in overall 1-year average performance from 100% to 95%. A drop this big likely had a negative impact on the seller’s ability to win the buybox.
Not Seeking Customer Feedback
Sellers don’t immediately start good habits of asking customers for feedback. Customer feedback is a poorly understood currency for most new sellers, yet it is critical to a seller’s long-term survival on Amazon:
- Seller Performance keeps track of the proportion of the number of pieces of feedback a seller gets compared to the number of orders the seller gets. The range of ideal feedback can vary somewhere between 2-5%.
- We have seen big new sellers show up and start selling a lot of volume quickly, but not ask for feedback at the same time. As a result, it is not uncommon for Amazon to hold back payment to the seller while Amazon waits to see if there is behavior by the seller trying to unload a lot of high-risk product quickly. A new seller may have a lot of great selection to offer, but it’s important to get customer feedback to help confirm for Amazon that you are an honest seller whose products are appreciated by your Amazon customers.
If a seller is still in the process of waiting to be ungated to sell in certain gated categories, and the seller has already accumulated negative feedback, order cancellations, or late shipment on orders, any of this performance data can be examined by the ungating team and may lead to the seller being turned down for permission to list in gated categories.
Highlights on Launching/Supporting Systems
Here’s a summary of our advice to new Amazon sellers:
Not All Your Products Require a Full Data Feed
Not all products require a full data feed to get loaded by you into the Amazon catalog. You can save yourself a lot of unnecessary work by first figuring out what is available already on Amazon.
- Systems: If you know the UPCs of your products, run those through our UPC search tool to find out which products that already have listings in the Amazon catalog
Accurate > Complete Product Data
Don’t worry if the data you submit isn’t complete (including all desired but not required fields of data). Instead, make sure what you do submit is as accurate as possible.
If you represent a product incorrectly, customers are much more likely to submit negative feedback against you. If you’re unsure about certain product data, double-check it with the manufacturer/supplier before you list the product.
- Systems: establish a master data feed which you update regularly for all of your SKUs. Request information from manufacturers or suppliers to backfill any missing data. Also, regularly request the category listing report in Seller Central. Use this report to compare your master data feed with any product data in your Seller account.
Don’t Experiment with Listings
Avoid experimenting with your listings data; if you list a product, assume it’s live and available for customers to purchase. Make sure every listing is priced accordingly, and inventory that you show to customers is actually available should orders come in. If you have to experiment, make 100% sure that you have zero quantity available at the end of your experiment, so you don’t get burned by orders you can’t fulfill.
- Systems: Regularly comparing your master data feed with the category listings report should help satisfy any price discrepancies, as long as your master data feed contains your desired product list prices.
Take Full Responsibility for Your Amazon Listings Data
You are responsible for your listings, whether you submitted the data for those listings or not. Create a process where you spot-check your active listings regularly. And delete all inactive offers if you don’t have any inventory and don’t plan to sell it again. Stay on top of the rules for the products you sell. And if you sell in high-risk categories, stay doubly on top of your listings.
- Systems: Once a month, delete inactive offers that you plan never to sell again
- Systems: Every 2-3 months, conduct risk management on your catalog – is there anything you need to remove from your catalog, based on customer feedback that you’ve received? If there is a repeating problem with a specific item, it’s time to evaluate if you can get the item fixed, sourced from somewhere else, or if it’s time to get rid of this item
Use a Simple Naming Convention
Save yourself a lot of headaches later, and create a simple-to-follow naming convention for your products.
- Systems: If you are a reseller or distributor, consider naming your products after the Manufacturer Part Number, so your purchase order and accounting system seamlessly matches your Amazon reporting. If you are the manufacturer, think “letters & numbers.”
Request Customer Feedback
Ask for customer feedback! There are inexpensive, third-party software tools like feedbackfive.com, feedbackgenius.com, and bqool.com that you can set up to automatically solicit feedback from your Amazon customers.
Not only do such tools typically generate a higher proportion of feedback per order, but they also free you up from having to create and manage a manual process of requesting customer feedback.
And you can ask for feedback on orders of only certainly ASINs, allowing you to filter out certain ASINs where you might expect higher negative feedback rates.
- Systems: Yup, we like seeing sellers using some sort of automated feedback tool to drive feedback counts.
Be Responsive to Customer Emails
Be responsive to customer inquiries, no matter how silly or minor the issue may appear to be.
You don’t have to agree with customers or make them happy, but you do have to answer every question from every customer within 24 hours.
- Systems: Designate specific people on your team to answer emails every day of the week. If that’s not possible, get yourself a subscription with a company that offers an autoresponder tool. See our Amazon Software provider list for some suggestions for autoresponder software.
Performance Metrics from Day One
No matter how new a seller you are to Amazon, you are expected immediately to abide by all performance metrics, including on-time shipping, confirmation of shipments, and answering all customer inquiries within a 24-hour period. New sellers don’t get a “warm-up” period.
- Systems: Before you launch with even your first product, make sure you’re ready to support Amazon customers according to Amazon’s performance criteria.
Aim for a Perfect First 10 Orders
Make sure the first 10 orders you get are fulfilled as perfectly as possible.
You don’t want dumb early mistakes to hurt your chances down the road of getting ungated for other categories, or earning Buy Box merchant status.
- Systems: This isn’t so much a “systems” issue, as it is a reminder that Amazon has high minimum standards for each and every seller on the Amazon marketplace.
Chapters
We’re a team of expert Amazon consultants who specialize in scaling mid-to-large product brands.
PO Box 1010 Riverton, UT 84065
Become great at selling on Amazon
Join our FREE newsletter and receive expert advice for executives managing the Amazon channel.